The best Victoria Harbour view isn’t from the highest point, but from the one that offers superior atmospheric clarity and strategic control over light.
- Sky100 provides a guaranteed, weather-proof experience with 360° views, ideal for technical night shots without reflections.
- Victoria Peak offers a classic, wider panorama but is highly weather-dependent, with long queues that can ruin a meticulously planned shoot.
Recommendation: For serious photography, Sky100 is the strategic choice; for a classic experience with time and weather on your side, The Peak delivers the iconic vista.
For any photographer, Hong Kong’s skyline is a formidable subject. It’s a vertical city that demands more than just a quick snapshot. The challenge isn’t finding a view, but finding the *right* view. The one that allows you to control the frame, master the light, and capture the architectural dialogue between the glass towers of Hong Kong Island and the dense urban fabric of Kowloon. Many guides will simply compare heights and ticket prices, pushing you towards the most famous spots. They’ll tell you to visit The Peak or Sky100, treating them as interchangeable commodities.
This approach misses the point entirely. From a photographer’s perspective, these are not just viewing platforms; they are fundamentally different tools for capturing the city’s soul. The real decision isn’t about which is higher, but which offers the best angle, the most forgiving light, and the greatest control over the final image. We often obsess over sunset times and weather forecasts, but ignore the critical factors of glass reflections, atmospheric haze, and the narrative framing offered by the viewpoint itself.
This guide moves beyond the generic tourist advice. We will dissect each major observation deck not by its popularity, but by its photographic potential. We’ll analyze the quality of the light, the specific angles on the harbour, and the practical challenges that can make or break a shoot. We’ll explore why a lower, more immersive view can sometimes be more powerful and how to execute a flawless final-day shoot before heading to the airport. This is about choosing your vantage point with the same precision you choose your lens.
To navigate this complex decision, this article breaks down every critical factor a photographer must consider. From a direct comparison of the two titans of tourism to the technical tricks for beating reflections, you will find the definitive answer to which deck truly offers the superior photographic opportunity.
Summary: A Photographer’s Guide to Hong Kong’s Skyline
- Sky100 or The Peak: Which Viewpoint Is Worth Your Money?
- When to Visit Observation Decks for the Perfect Sunset Shot?
- Why Building Soaring Skyscrapers in Hong Kong Is an Engineering Miracle?
- The Glass Reflection Error That Ruins Night Photos From Indoors
- How to Find Free Rooftop Views Without Paying Admission Fees?
- Floor 10 vs Floor 50:Leaving Hong Kong: How to Optimize Your Final Day Logistics?
- City View vs Harbour View: Why City View Can Be More Cyberpunk?
- How to Plan a Visit to Victoria Peak Without Waiting 2 Hours in Line?
Sky100 or The Peak: Which Viewpoint Is Worth Your Money?
The central debate for any first-time visitor is Sky100 versus The Peak. A simple comparison of metrics is misleading; the experience and photographic output are wildly different. From an architectural photographer’s standpoint, the choice depends entirely on your objective: capturing the iconic, sprawling panorama or a controlled, detailed architectural study.
The Peak offers the classic, wide-angle vista you’ve seen on postcards. Its higher elevation and position facing Kowloon provide a breathtaking, expansive view. However, this classic shot comes with significant liabilities. It’s an almost entirely outdoor experience, making your shoot entirely dependent on unpredictable weather. A single low-hanging cloud can render the entire trip worthless. Furthermore, the infamous Peak Tram queues can eat hours of your day, a disaster if you’re trying to catch the fleeting light of the golden hour.
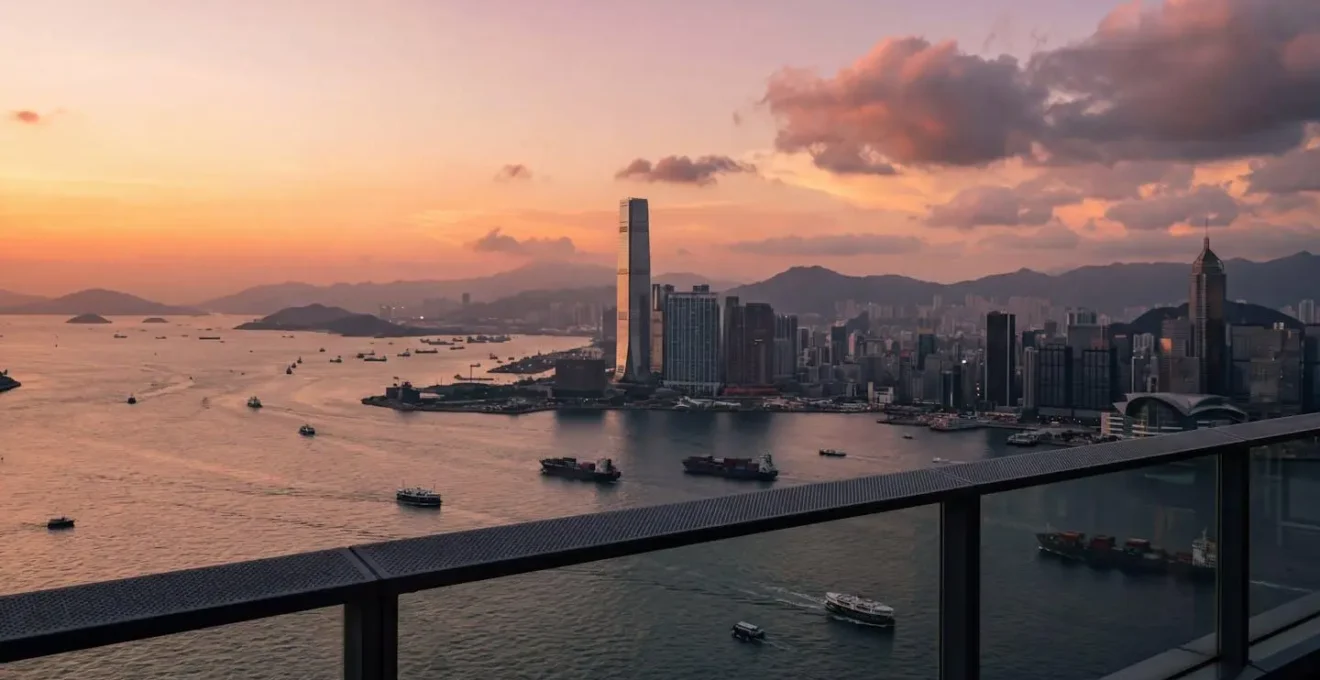
Sky100, located within the International Commerce Centre (ICC), presents a more strategic proposition. It’s an indoor, climate-controlled environment, which means your view is guaranteed, regardless of rain or wind. This reliability is invaluable. While slightly lower than The Peak, its 360-degree panoramic view offers a dynamic range of compositions, facing Hong Kong Island directly for dramatic silhouette opportunities. For a photographer, this control is paramount. The consistent positive feedback, with Sky100 receiving TripAdvisor’s Certificate of Excellence for 9 consecutive years, speaks to its reliable, high-quality experience. Many visitors report wasted trips to The Peak during cloudy weather, a risk a serious photographer cannot afford.
The following table breaks down the key differences, but the narrative is clear: The Peak is for the classic experience if you’re willing to gamble on weather and time. Sky100 is the photographer’s choice for control, reliability, and diverse compositional options.
| Criteria | Sky100 | Victoria Peak |
|---|---|---|
| Height | 393m above sea level | 428m above sea level |
| View Angle | 360° panoramic, faces Hong Kong Island | Wide-angle, faces Kowloon |
| Weather Protection | Indoor, climate-controlled | Mostly outdoor, weather-dependent |
| Queue Times | Minimal, fast elevators | Often 1-2 hours for Peak Tram |
| Adult Ticket | HK$150-186 | HK$45-110 (with tram) |
| Best Feature | Guaranteed view, VR experiences | Classic heritage experience, nature walks |
When to Visit Observation Decks for the Perfect Sunset Shot?
Timing is everything in photography, but in Hong Kong, it’s a multi-layered science. It’s not just about arriving before sunset; it’s about understanding the seasonal atmospheric clarity, the direction of the light, and the transition into the city’s illuminated state. The perfect shot is a confluence of weather, time, and position.
First, the season dictates the quality of the air. For the sharpest, most detailed cityscapes, plan your visit between October and February. This period generally offers the clearest skies with lower humidity, less rainfall, and minimal risk of typhoons that can obscure the view for days. Arriving at your chosen deck at least 30 minutes before sunset is standard practice, allowing you to secure a prime spot and set up your equipment without rushing.
However, the real magic for a photographer happens not at sunset, but in the moments that follow. The “blue hour”—the 20-30 minute window after the sun has dipped below the horizon—is when the city truly comes alive. The deep, saturated blue of the twilight sky creates a stunning contrast with the warm, artificial glow of the newly lit skyscrapers. This is the moment when the “architectural dialogue” is at its most dramatic. At Sky100, which faces west, you can capture a ‘reverse sunset’ as the sun disappears behind Hong Kong Island, creating powerful silhouettes against a vibrant sky.
Why Building Soaring Skyscrapers in Hong Kong Is an Engineering Miracle?
To photograph Hong Kong’s skyline is to appreciate its sheer verticality. This is not just a collection of tall buildings; it is a testament to extraordinary engineering ambition constrained by limited space. The city has one of the highest concentrations of skyscrapers in the world, a forest of steel and glass rising from a narrow strip of land. Understanding the scale of this achievement adds another layer to your photography, transforming a simple cityscape into a story of human ingenuity.
The International Commerce Centre (ICC), home to Sky100, is a prime example of this vertical drive. The fact that the ICC stands at 484 meters with 118 floors, making it one of the tallest buildings on the planet, is a staggering feat of engineering on reclaimed land. Photographing the skyline from within one of its giants, or aiming your lens at it, is to capture a piece of this architectural legacy. The challenge for engineers was not just to build high, but to do so in a typhoon-prone region on complex geological foundations.
Yet, what makes the Hong Kong skyline uniquely compelling is the dialogue between the man-made and the natural. It’s an element many photographers miss, focusing only on the “concrete jungle.” As the China Highlights Travel Guide wisely notes in its Hong Kong Skyline Guide, this contrast is intentional.
Hong Kong government limited the height of buildings, so we can usually admire the skyline with green mountains in the background.
– China Highlights Travel Guide, Hong Kong Skyline Guide 2025
This deliberate integration creates a powerful compositional tension. The organic, rugged lines of the mountains serve as a natural backdrop to the rigid, geometric forms of the skyscrapers. When you compose your shot, you are not just capturing buildings; you are capturing this dance between ambition and nature, a core part of Hong Kong’s identity.
The Glass Reflection Error That Ruins Night Photos From Indoors
For a photographer, the pristine, climate-controlled environment of an indoor observation deck like Sky100 comes with one major adversary: glass reflection. Capturing a clean, sharp night shot through a pane of glass is a technical challenge that separates amateurs from professionals. The interior lights of the observation deck bounce off the window and create ghostly flares, streaks, and even a faint image of yourself in the final photo, a phenomenon I call ‘light contamination’.
Fortunately, combating this is a matter of technique, not expensive gear. The most effective method is often the simplest. You must create a light-proof seal between your camera lens and the glass. While specialized lens hoods and silicone shields exist, a dark piece of clothing is often all you need. Pressing the lens flush against the window and draping a jacket or scarf over your camera and hands creates a mini darkroom, blocking stray interior light from reaching the lens.
For those with more equipment, a Circular Polarizer (CPL) filter can work wonders, even at night. By rotating the filter, you can significantly reduce or eliminate polarized light, which includes many of the reflections from the glass. It requires fine-tuning, but the result is a much cleaner, more vibrant image of the city beyond. Angling your camera slightly downwards can also help by avoiding the brightest ceiling lights. Mastering these anti-reflection techniques is non-negotiable for achieving professional-quality results from any indoor viewpoint.
Your Action Plan: Beating Indoor Reflections
- The Zero-Cost ‘Clothing Shroud’: Use a dark jacket or scarf to create a shroud around your camera lens, pressing it against the glass to block interior light reflections.
- Professional CPL Filter: Rotate a Circular Polarizer filter, even at night, to significantly reduce interior light reflections on windows.
- Sky100 AR App Solution: For a quick, reflection-free shot, download the Sky100 app which uses augmented reality to bypass the issue.
- Position Strategy: Move as close to the glass as possible and angle your camera slightly downward to minimize reflections from ceiling lights.
How to Find Free Rooftop Views Without Paying Admission Fees?
While paid observation decks offer unparalleled height, some of the most compelling photographs of Hong Kong are taken from mid-level vantage points that are completely free. These spots provide a different perspective, often more immersive and grounded in the city’s urban texture. Finding them requires a bit of local knowledge, but the payoff is a unique shot that most tourists will miss.
One of the best-kept secrets is the public rooftop garden at the IFC Mall. Many visitors pass through this high-end shopping center without realizing a stunning, free viewpoint is just an escalator ride away. This terrace offers a fantastic mid-level perspective of the Kowloon skyline across the harbour. It provides an excellent, relaxed environment where you can set up a tripod (with consideration for others) and enjoy a drink while waiting for the perfect light. It proves that a great view doesn’t always come with an admission fee.
The IFC Mall is just one of several free options available to the savvy photographer. Hong Kong is dotted with publicly accessible spaces in private buildings and new waterfront promenades that have been designed to offer spectacular views. Exploring these locations can add a whole new dimension to your portfolio.
- One Island East Sky Lobby: A free observation deck on the 46th floor in Quarry Bay, just one elevator ride from the main entrance.
- Central Plaza: The lift lobby on the 46th floor offers panoramic indoor views at no cost, providing a high-altitude perspective without the ticket price.
- Ocean Terminal Deck: This rooftop of a shopping complex extension offers a stunning 270-degree panorama of the harbour.
- Peak Galleria: Even at The Peak, you can avoid the Sky Terrace fee by using the free viewing areas at the adjacent Galleria, open daily.
- Wan Chai Promenade: Hong Kong’s first ‘barrier-free’ waterfront offers unobstructed, ground-level views of the Kowloon skyline, perfect for long exposures of the water.
Floor 10 vs Floor 50:Leaving Hong Kong: How to Optimize Your Final Day Logistics?
A photographer’s final day in a city is a strategic challenge: how to squeeze in one last shoot without compromising travel logistics, especially when burdened with heavy camera gear. This is where the location of your chosen viewpoint becomes as critical as the view itself. The wrong choice can lead to a stressful dash to the airport, while the right one offers a seamless transition from creative work to departure.
This is another area where Sky100 demonstrates its superior strategic value for a traveler. Its location is not just a convenience; it’s a logistical masterpiece. The fact that Sky100 is directly connected to Kowloon Station, which offers Airport Express in-town check-in services, is a game-changer. This integration allows for an incredibly efficient departure plan that maximizes both photography time and convenience.
The Seamless Departure Strategy
The synergy between Sky100 and Kowloon Station allows a traveler to execute a flawless final day. You can arrive at Kowloon Station, check in for your flight, and drop off your luggage. Free from your heavy bags, you can then take the elevator up to Sky100 for a final, unencumbered photo session. Afterwards, you can grab a meal at the Elements mall below before boarding the Airport Express directly to the airport. This turns your departure day from a logistical headache into a productive and enjoyable final chapter of your trip.
This level of integration is simply unmatched by other viewpoints like The Peak, which would require a complex and time-consuming journey with all your luggage back to your hotel and then to the airport. For a photographer looking to make the most of every last minute, Sky100’s location above a major transport hub makes it the unequivocally smarter choice for a final day in Hong Kong.
City View vs Harbour View: Why City View Can Be More Cyberpunk?
While the harbour view is Hong Kong’s signature, turning your lens 180 degrees can reveal a scene that is arguably more evocative and photographically interesting: the city view. Looking back into the dense urban landscapes of Kowloon or Hong Kong Island offers an opportunity to capture the “cyberpunk” aesthetic that has come to define the city in popular culture. It’s a view of vertical compression and overwhelming scale.
The harbour view is beautiful but can feel distant and almost too perfect. The city view, in contrast, is immersive and chaotic. It’s about layers of buildings, neon signs, and the endless grid of windows, all stacked on top of each other. This is the perspective that captures the feeling of a “concrete jungle.” As Sky100 management noted in a response to a visitor, the city view allows you to truly “feel what people describe Hong Kong as the ‘Concrete Jungle’ at day time”. At night, this transforms into a neon-drenched dystopia straight out of a science fiction film.
To capture this aesthetic effectively, you need to think about creating a sense of overwhelming density. Positioning yourself at a viewpoint like Sky100 makes you feel like you are part of the skyline, not just observing it from afar. Using a wide-angle lens can exaggerate the scale, while shooting from mid-level pedestrian footbridges in areas like Causeway Bay creates a powerful ‘urban canyon’ effect. Techniques for achieving the cyberpunk look include:
- Emphasize Layered Verticality: Shoot from mid-level positions in dense areas like Mong Kok to show buildings stacked in front of each other.
- Exaggerate Scale: Use a wide-angle lens to make the buildings feel like they are closing in on the viewer.
- Capture Motion: Use long exposures to turn traffic into trails of light, adding a futuristic, dynamic feel.
- Grade with Color: In post-processing, push the colors towards cool blues and magentas to enhance the neon glow and create that signature cyberpunk mood.
Key takeaways
- For guaranteed, weather-proof shots and logistical convenience, Sky100 is the superior choice for serious photographers.
- The “blue hour,” the 20-30 minutes after sunset, offers the best light for dramatic skyline photography, balancing city lights with twilight sky.
- Beating indoor glass reflections is crucial; use a dark cloth to shroud your lens or a CPL filter to eliminate glare.
How to Plan a Visit to Victoria Peak Without Waiting 2 Hours in Line?
If your heart is set on the classic, iconic panorama from Victoria Peak, your biggest challenge won’t be your camera settings, but a battle against time and crowds. The infamous queue for the Peak Tram can stretch to two hours or more, a frustrating waste of time that can cause you to miss the perfect light. Planning a visit to The Peak is a logistical operation, but with the right strategy, you can bypass the worst of the crowds.
The cardinal rule is to break the conventional travel pattern. The longest queues are for the tram going *up* during the afternoon and sunset. The smart move is to ascend via an alternative method. Taking Bus 15 from the Central Ferry Piers or simply hailing a taxi are efficient and surprisingly scenic ways to get to the top, completely bypassing the main tram line. You can then enjoy the view and, when you’re ready to descend, take the Peak Tram *down* later in the evening when the queues are significantly shorter or non-existent.
Timing your visit is also crucial. The golden windows to avoid the crowds are on weekday mornings between 9-10 AM, before the tour buses arrive, or late at night after 9:30 PM, once the dinner crowds have dispersed. A little-known trick is that buying a combo ticket for Madame Tussaud’s at its separate office can sometimes allow you to skip the main ticket queue. However, be aware that even a pre-booked online ticket only lets you skip the ticket-purchasing line, not the much longer line for boarding the tram. For a truly queue-free descent, a brisk 35-minute walk down the scenic Old Peak Road to Central is a fantastic option.
Ultimately, the “best” view is subjective, but for a photographer, the best *process* is objective. It requires control, reliability, and strategic planning. While The Peak offers an undeniable romance, Sky100 provides the superior toolkit for crafting a deliberate and technically sound architectural photograph. To execute your vision with precision, start by analyzing your options and planning your shoot with the logistical and environmental factors firmly in mind.